Recycled Can Bird Feeder

Age Group: 2nd-5th grade

Total time: 1 hour

Supplies

  • Cans | 1+

  • Sticks | 1+

  • Acrylic Paint

  • Ribbon

  • Tape

Directions

  1. Carefully tape the inner edge of the can(s) to prevent sharp edges from poking out.

  2. Paint the outside of the can(s).

  3. Attach the stick (with 1-2 inches sticking out) to the inside of the can with tape.

  4. Knot the ribbon around the can and tie a loop on the other end. Tape the ribbon to keep it in place.

  5. Fill the can(s) halfway with birdseed.

  6. Hang the birdfeeder from a tree branch or other location. Watch the birds come and go!

Image source Momtastic.com

Image source Momtastic.com

Recycled Bottle Bowling

Age Group: 3rd-6th grade

Total time: 1 hour

Supplies

  • Clean Empty Bottles | 10

  • Ball | 1-3

  • Tape | 1 roll

  • Sand (optional) | 1 pound

Directions

  1. Wrap two strips of tape around each of the bottles to resemble a bowling pin.

  2. (optional) Fill each bottle with a couple tablespoons of sand to make it more stable.

  3. Set up bottles in the formation of bowling pins.

  4. Play! Knock over the bottles with a ball. Keep score and track among players.

Image source Kidsomania.com

Image source Kidsomania.com

Leaf Threading

Age Group: 3rd-5th grade

Total time: 15 minutes

Supplies

  • Leaves

  • Thread/Yarn

  • Stick/Needle

  • Hole Puncher

  • Tape (optional)

Directions

  1. Gather leaves from outside. You can try to find whatever colors and shapes you want to be on the final design.

  2. Punch holes in the leaves.

  3. Try to fit the thread through the holes to connect the leaves. If it helps, attach a stick or needle to the beginning of the thread to make it easier to lead it through the holes. Go in the order you want the leaves in! You can even add some beads if you want!

  4. To finish the thread, you have to connect the beginning and the end to make a loop. You can either tie the thread to complete the loop or use tape.

Image source PickleBums.com

Image source PickleBums.com

Make a Jackson Pollock Painting!

Age Group: K-5th grade

Total time: 15-30 minutes

Supplies

  • Canvas | Can be paper, cardboard, or any canvas

  • Paint

  • Paintbrush

  • Plate

Directions

  1. Get ready for a mess! You can do this outside and place old newspapers around the canvas.

  2. Pour the paint onto a plate. You can use a different plate for each color, or you can space them out on one plate. You can even try mixing some colors!

  3. Dip your paintbrush in the paint. Now fling the paintbrush so the paint splatters on the canvas! It may take some time to get the technique down, so keep experimenting! You could try flinging down or flicking up the paintbrush to get the paint to splatter how you want.

  4. You can even pour a little directly from the paint bottle. Just make sure not to cover up your entire painting!

Image source ArtsyCraftsyMom.com

Image source ArtsyCraftsyMom.com

Sidewalk Chalk Paint

Age Group: K-5th grade

Total time: 30-45 minutes

Supplies

  • 2 tbsp cornstarch

  • 2 tbsp water

  • 1/2 tbsp sidewalk chalk (approx 1/4 to 1/2 a piece of chalk)

  • Containers

  • Paintbrushes

  • Measuring Cup

Directions

  1. Add 2 tablespoons of cornstarch into a measuring cup.

  2. Add 2 tablespoons of water into the cup and mix. Note: if you find the paint does not paint well, add an additional tablespoon of water.

  3. Grate sidewalk chalk to get approx 1/2 tablespoon of chalk. Add it into the cup. If you would rather not grate the chalk, place the chalk pieces into a ziploc bag and bang with a rolling pin until it turns into a similar consistency. Mix.

  4. Pour the paint mixture into a muffin tin once fully mixed.

  5. Repeat for each color you'd like to make.

Image source TheBestIdeasForKids.com

Image source TheBestIdeasForKids.com

Bubble Painting

Age Group: K-5th grade

Total time: 30-45 minutes

Supplies

  • A large sheet of paper

  • Bubbles

  • Liquid watercolors or food coloring

  • Containers/cups

Directions

  1. Pour bubble solution into several different containers (1 for each color)

  2. Add liquid watercolors or food coloring. You’ll need to use a lot, especially if you’re using food coloring.

  3. Spread out your sheet of paper outside and blow bubbles directly onto the paper.

  4. Let dry and enjoy!

Image source LivingWellMom.com

Image source LivingWellMom.com

Toilet Paper Kazoo

Age Group: 1st-3rd grade

Total time: 15-30 minutes

Supplies

  • Long cardboard tube (paper towel or wrapping paper tube)

  • Markers, crayons

  • Wax paper

  • Rubber band

  • Pencil

Directions

  1. Decorate the tube any way you want using markers and crayons

  2. Cut a piece of wax paper so that it will fit over the end of the tube

  3. Use a rubber band to hold it in place

  4. Use a pencil to poke a few holes in the wax paper

  5. Blow into the other end of the tube and see what noises come out!

Image source TodaysParent.com

Image source TodaysParent.com

Bell Bracelet

Age Group: All ages

Total time: 15-30 minutes

Supplies

  • Pipe cleaner

  • Pony beads

  • Jingle bells

  • Scissors

Directions

  1. Wrap the pipe cleaner around your wrist to see what size bracelet you should make

  2. Start putting the beads through the pipe cleaner and periodically put a jingle bell on it

  3. Stop once you have a little bit left of the pipe cleaner

  4. Wrap the ends around each other to close the bracelet

  5. Shake your hand and you will hear music coming from the bracelet!

Image source AllKidsNetwork.com

Image source AllKidsNetwork.com

Animal Dancing

Age Group: K-2nd grade

Total time:

Supplies

  • Device to play music on

Directions

  1. Start by playing any kind of music and have the players dance to it!

  2. At any point, pause the music and say a type of animal. The players must now start dancing like they think that kind of animal would. For example, if the animal was an elephant the players could start waving their arms around like a trunk!

  3. Whoever is controlling the music is the judge- for each animal they pick the impression that they think was the most accurate and gives that player a point!

  4. The first player to 4 points wins!

Animal Dancing

Lyric Matcher

Age Group:

Total time:

Supplies

  • Paper

  • Pencils/pens

  • Lyrics to some favorite songs!

  • Bowl or hat to pull lyrics out of

Directions

  1. Select 5-10 songs that all participants know (can select more if you want to play more rounds)!

  2. Pick 2-3 phrases from each and write them on a piece of paper. Fold the pieces in half so the lyrics are hidden.

  3. Put the pieces of paper into a bowl or paper bag. Shake them up and have the youngest player pull the first one out!

  4. Read the lyric out loud- whoever is the first to guess what song it came from gets a point! To make the game a little easier, sing the lyrics out instead of reading them. To make it a little harder, read the lyrics in an accent!

  5. Go around the room and take turns reading out the lyrics and guessing.

  6. Whoever gets to 5 points first wins! (can make it a higher number if want to play for longer)

Image source Trebound.com

Image source Trebound.com

Rain Stick

Age Group: 2nd-4th grade

Total time: 15-30 minutes

Supplies

  • Long cardboard tube (paper towel or wrapping paper tube).

  • Aluminum foil

  • Small dried lentils, unpopped popcorn, dry rice, or tiny pasta

  • Tape

  • Scissors

  • Construction paper

  • Optional: Crayons or markers

Directions

  1. Trace around the end of your tube onto a piece of construction paper.

  2. Draw a circle that is roughly two times bigger than your first circle (around that first circle) and then draw four spokes between the two circles.

  3. Cut along the lines and tape the spokes onto one end of your tube.

  4. Cut a few pieces of aluminum foil that are about 1 and half times the length of your tube and about 6 inches (or half a foot) wide.

  5. Crush the aluminum foil into long, thin, snake-like shapes. Then twist each one into a spring shape. Place the aluminum foil springs into your tube.

  6. Pour some dry beans, dry rice, unpopped popcorn, or tiny noodles into your tube. The tube should be only about 1/10 full.

  7. Make another cap from the construction paper by repeating steps 1-3.

  8. Optional: decorate the tube by covering it with construction paper and then drawing on it with crayons or markers.

Image source GiftOfCuriosity.com

Image source GiftOfCuriosity.com

Singing Straws

Age Group: 1st-3rd grade

Total time: 10 minutes

Supplies

  • 6-8 Plastic Straws

  • Tape

  • Scissors

  • Optional: colored sticker paper

Directions

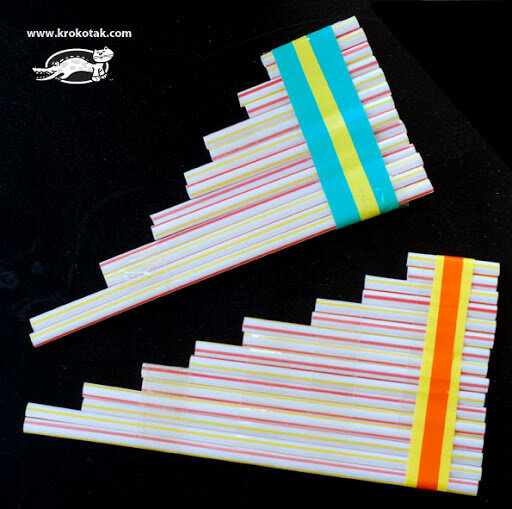
  1. Cut plastic straws into different lengths.

  2. Cut a long strip of tape and lay the tape on a flat surface sticky side up.

  3. Place the cut straws from biggest to smallest on the tape.

  4. Wrap the excess tape around the straws.

  5. If needed, add more tape to fully secure the straws.

  6. Optional: decorate your instrument with the colored sticker paper.

  7. Hold the instrument a few inches away from your face and blow into the straws.

Image source Krokotak.com

Image source Krokotak.com

Musical Statues

Age Group: K-4th grade

Total time: 5-30 minutes

Supplies

  • Device to play music on

Directions

  1. Play music on a device

  2. While the music is playing everyone dances around the room

  3. Stop the music every now and then. Once the music stops, everyone must freeze in the exact position they were dancing

  4. If you move you are “out”

    • For younger children, you can keep going without anyone going “out”

Image source RealPlayCoalition.com

Image source RealPlayCoalition.com

Rice Dance: VIsual Soundwaves

Age Group: 4+

Total time: 5-30 minutes

Supplies

  • Big Bowl

  • Plastic Wrap

  • Uncooked Rice | 1 teaspoon

  • Metal Pan and Spoon

Directions

  1. Place the plastic wrap tightly over the bowl

  2. Place 1 teaspoon of rice on the plastic

  3. Hold the metal pan close to the bowl and have your child hit the pan with the spoon

  4. You should see the rice that is placed on the plastic wrap over the bowl dance, demonstrating that as the pan vibrates it is creating a sound wave through the air molecules and causing the plastic wrap to vibrate

Image source MakeAndTakes.com

Image source MakeAndTakes.com

Glowstick Drumming

Age Group: K-2nd grade

Total time: 5 minutes

Supplies

  • Thick glowsticks | 2

  • 2 Drums | Pans, pails, yogurt containers (any big containers work!)

Directions

Just place whatever you choose to use for your drums upside down, crack your glowsticks to make them glow, and start drumming! Turn the lights off to enjoy the glowsticks even more! Make your own rhythms and songs.

Image source GoldBio.com

Image source GoldBio.com

Mini Lid Banjos

Age Group: K-5th grade

Total time: 10-15 minutes

Supplies

  • Old jar lids | 1 for each banjo

  • Loom bands | 3-4 per banjo

  • Craft popsicle stick | 1 per banjo

  • Duct tape

  • Craft glue

  • Decorations!

Directions

  1. Place four loom bands over the lid and secure in place with a piece of duct tape.

  2. Next cut the end from your jumbo craft stick and decorate the stick.

  3. Attach the lid with loom bands in place to the craft stick with a second piece of duct tape.

  4. Decorate more if you please and then you have yourself a mini banjo!

Image source TheCraftTrain.com

Image source TheCraftTrain.com

Paper Plate Tambourines

Age Group: 3 and up!

Total time: 10-15 minutes

Supplies

  • Paper Plates | 2

  • Dried beans, pasta, or rice | Up to you!

  • Staples

  • Decorations!

Directions

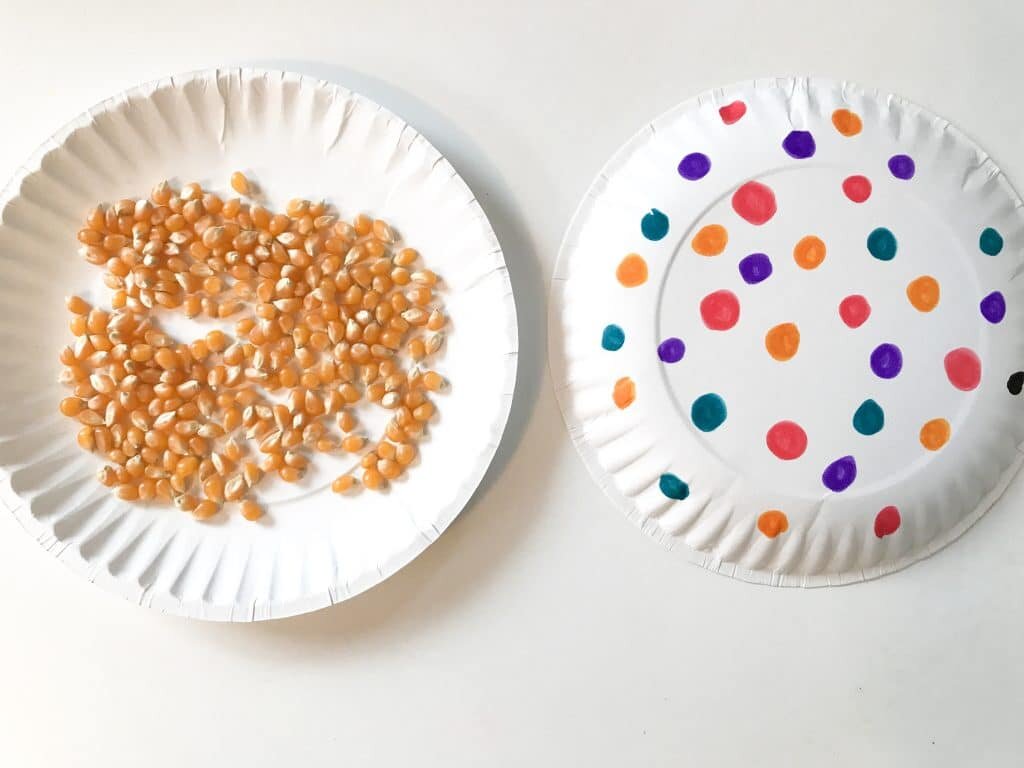
  1. Place one plate right side up on the table and put some beans or dried pasta on the plate or both!

  2. Place your second plate upside down on top of the first. Staple around the edges to hold in the ~ingredients~.

  3. Decorate as you please and shake to play!

Image source TheChirpingMoms.com

Image source TheChirpingMoms.com

Dancing Stick Figure

Age Group:

Total time:

Supplies

  • A glass plate or bowl

  • Dry erase marker

  • Water

Directions

  1. Draw a stick figure on the glass.

  2. Slowly pour water onto the plate or into the wall. The drawing will lift off the glass and float on top of the water.

  3. Swirl the water around to make your stick figure dance!

  4. Try again with another picture. Get creative!

Image source ScienceBuddies.org

Image source ScienceBuddies.org

Musical Water Glasses

Age Group: 3rd-5th grade

Total time:

Supplies

  • Water glasses

  • Water

  • Plastic spoon

  • 8 identical water glasses (optional)

  • A set of measuring cups (optional)

  • Paper, tape and a writing utensil (optional)

Directions

  1. If you want to keep it simple, just fill up as many cups as you like and see what sounds each cup makes when tapped lightly with the spoon. Does more water in the cup create a higher or lower pitched sound?

  2. If you want to get more advanced and play a real song, fill up your 8 identical water glasses with the following amounts of water:

    • 14/8 c, 12/8 c, 10/8 c, 8/8 c, 6/8 c, 4/8 c, 2/8 c, 0/8 c

  3. Label the glasses, with 1 being the most full glass and 8 being the empty glass.

  4. See what sound each cup makes when tapped lightly with the spoon. Does more water in the cup create a higher or lower pitched sound?

Image source GreenKidCrafts.com

Image source GreenKidCrafts.com