Popsicle Stick Harmonica

Age Group: all ages

Total time: 20 minutes

Supplies

  • Craft sticks | 2

  • Small rubber bands | 2

  • Paper | 1 sheet

  • Scissors

  • Toothpicks | 2

Directions

  1. Cut a piece of paper the length of a craft stick.

  2. Place the paper onto one of the craft sticks.

  3. Place another craft stick on top and wrap one small elastic band around one of the ends.

  4. Cut the toothpick to the width of the craft stick and place between the craft sticks and the piece of paper as close to the elastic and as possible.

  5. Tuck the toothpick in so it does not stick out on either side.

  6. Repeat with the toothpick on the other side and wrap the other end with an elastic band.

  7. Blow into your new harmonica.

Image source MumInTheMadHouse.com

Image source MumInTheMadHouse.com

DIY Bongo Drums

Age Group: all ages

Total time: 30 minutes

Supplies

  • Empty canisters (same height) | 2

  • Medium-sized balloons (not inflated) | 2

  • Scissors

  • Fun duct tape

Directions

  1. Cut the necks of the two balloons

  2. Stretch the balloons over the top of the two canisters

  3. Use the duct tape to tape the balloons around the canister and seal it in place

  4. Experiment by tapping the bongos!

Image source HappyMoneySaver.com

Image source HappyMoneySaver.com

Bottle Top Castanets

Age Group: K-2nd grade

Total time: 20 minutes

Supplies

  • Cardboard

  • Bottle tops

  • Scissors

  • Markers or paint to decorate!

Directions

  1. Gather all your supplies.

  2. Cut your piece of cardboard into pieces that are around 5 inches by 1.5 inches. Each piece will make one castanet.

  3. Fold this piece in half and decorate them however you like! You can paint them, draw designs on them, or even cover them in glitter!

  4. Get two bottle tops for each castanet, and put glue onto the jagged sides of each one.

  5. Glue them onto the inside of the ends of your piece of cardboard (see picture for reference), making sure they line up with each other and touch when you squeeze the cardboard.

  6. Once the glue is dry squeeze together the ends to make the bottle tops touch and create your own beat!

Image source KidsChaos.com

Image source KidsChaos.com

Tambourine

Age Group: 3rd-4th grade

Total time: 25 minutes

Supplies

  • Small Paper Plate | 1

  • Crayons, Stickers, Markers, etc… (optional)

  • String or Yarn | 7, three inch long sections

  • Jingle Bells | 7 bells

  • Hole Punch or Pencil

  • Scissors and a Ruler

Directions

  1. (Optional) Decorate the back of the small paper plate using the crayones, stickers, or markers, etc…

  2. Cut 7 pieces of string roughly inches in length.

  3. Thread one jingle bell onto each piece of string.

  4. Use either your hole punch or a pencil to poke seven holes around the edge of the plate. Don't get too close to the edge or your jingle bell will rip through.

    • You might need a parent or guardian to help you with this step.

  5. Tie each jingle bell to the plate and cut the excess yarn off.

  6. Shake, shake, shake!!

Image source FirstPalette.com

Image source FirstPalette.com

Shaker Eggs

Age Group: K-2nd grade

Total time: 15 minutes

Supplies

  • Plastic Eggs | 2+

  • Rice, Beans, Popcorn Kernels, Lentils, or Small Rocks | 1-2 tsp/egg

  • Washi tape

Directions

  1. Open plastic egg.

  2. Fill with 1-2 tsp of any of the filler items listed under supplies.

  3. Close the plastic egg tightly.

  4. Wrap along where the plastic egg opens with washi tape to ensure it doesn’t open accidentally when shaking.

  5. Shake the plastic egg!

Image source AMomsImpression.com

Image source AMomsImpression.com

Draw What You Hear!

Age Group: K-2nd grade

Total time: 15-30 minutes

Supplies

  • Paper or canvas (something to draw on!)

  • Pencils, colored pencils, pens, paintbrushes and paint, etc. (something to draw with!)

  • Music

Directions

This is a very simple activity but can also be very creative and fun! Start by playing some music and then drawing what you hear. This can be anything you want and can demonstrate how the music makes you feel. Use different colors for different songs. Experiment with different genres of music to see how they make you feel and how it affects your drawing!

Draw What You Hear

Soda Bottle Organ

Age Group: 3rd-5th grade

Total time: 15-30 minutes

Supplies

  • Empty Glass Soda Bottles

  • Water

  • Food coloring or stickers (optional)

Directions

  1. Fill the soda bottles up with different amounts of water.

  2. Blow into the top of the soda bottle (make sure the cap is off!) and listen for a tone. It may take some practice to get the right technique, so keep trying!

  3. You can arrange the bottles from high to low notes or from low to high notes if you want! You can also try adding food coloring and mixing to get different colors for the “organ”, or you can use stickers instead.

  4. Practice coming up with different songs!

Image source TheOTToolbox.com

Image source TheOTToolbox.com

Canvas Drum Painting

Age Group: K-2nd grade

Total time: 20-30 minutes

Supplies

  • Newspaper

  • Canvas

  • Acrylic or Tempera paint

  • Jumbo craft sticks

  • Some music

Directions

  1. First, lay out a lot of newspaper to protect your table and floor from the paint splatter.

  2. Find a song to begin with.

  3. Squeeze some paint on your canvases and then turn on the music.

  4. Pick up your craft sticks and use them as drumsticks and pound away on your canvases to the beat of the music.

  5. Work on one color at a time. Drumming on top of each new color.

Image source ThePinterestedParent.com

Image source ThePinterestedParent.com

Spin Drums

Age Group: 3rd-5th grade

Total time: 30-45 minutes

Supplies

  • Empty ribbon spools (3.25 inches)

  • Paper straws

  • Card stock

  • Ribbon or twine

  • Wood beads

  • Hot-glue gun or craft glue

Directions

  1. Make a hole on the bottom of the cardboard spool (this is where the paper-straw handle will go). Next, make a hole on both sides of the spool, right in the center (this is where the beads will be attached).

  2. Slide the paper straw into the bottom opening.

  3. Cut two six-inch-long pieces of ribbon (or twine). Tie a knot on one end of the ribbon and, using a hot-glue gun or craft glue, affix the ribbon to one of the side holes on the spool. Repeat steps for the other side.

  4. Measure and cut 3.25-inch circles from card stock.

  5. Decorate two card stock circles

  6. Glue the decorated circles onto the ribbon spools.

  7. Pick two beads each. Thread the beads through the ribbon/twine and tie a knot. Secure the bead in place with glue.

Image source Minted.com

Image source Minted.com

Bubble in a Bubble

Age Group: toddlers

Total time: 20 minutes

Supplies

  • Water | 1 cup

  • Dish soap | 1 Tb.

  • Sugar | 1 Tb.

  • Straw

Directions

  1. Mix the water, dish soap, and sugar.

  2. Spread the mixture on the table.

  3. Dip the straw into the mixture and use it to blow a bubble on the table.

  4. Dip the straw into the mixture again and dip it into the first bubble. Blow another bubble inside the first bubble.

Image source SteveSpanglerScience.com

Image source SteveSpanglerScience.com

Tornado in a Glass

Age Group: K-5th grade

Total time: 30 minutes

Supplies

  • Water

  • Liquid dish soap | a few drops

  • Chunky glitter | optional

  • Glass

  • Pencil

Directions

  1. Fill the glass ¾ of the way with water and add a few drops of liquid dish soap.

  2. Hold the glass with one hand and stir the water with the pencil to create a vortex with the other.

  3. Add the chunky glitter if you want to see how water currents move inside the glass.

Image source RookieParenting.com

Image source RookieParenting.com

Tin Foil Boat Challenge

Age Group: 3rd-5th grade

Total time: 30 minutes

Supplies

  • Tin foil | 1 per participant

  • Bucket | 1 per participant

  • Water

  • Pennies

  • Stopwatch

Directions

  1. Gather your materials.

  2. Start your stopwatch and give yourself 10 minutes to build a boat strong enough to hold as many pennies as possible using one sheet of tin foil.

  3. Once you're confident in the stability and strength of your boat, put it into your bucket of water and make sure it floats and there are no leaks!

  4. After you’re sure your boat will float well, start adding pennies. Make sure you keep track of how many pennies have been added!

  5. Keep adding pennies until your boat sinks! Try running multiple trials and arrange the pennies differently to see if it changes how many pennies your boat can hold!

Image source Medium.com

Image source Medium.com

Color Melting

Age Group: 3rd-5th grade

Total time: 20-40 minutes

Supplies

  • Ice

  • Construction Paper (black and at least two other colors)

  • Tin Foil

  • Stopwatch

Directions

  1. Gather ice, a stopwatch, tin foil, and construction paper of at least 3 different colors. One of the colors should be black in order to show the best results!

  2. Take the pieces of paper and tin foil outside and put pieces of ice on top of each. Start the stopwatch when you put the ice on the paper and tin foil Depending on how cold it is that day, you might want to bring out some hot chocolate to sip on or a book to read while the ice begins to melt!

  3. Keep track of which takes the shortest amount of time to melt. Think about why the different materials might result in different melting times! (hint: amount of heat absorbed by each material!)

Image source BetterLesson.com

Image source BetterLesson.com

Chromatography Butterfly

Age Group: K-5th grade

Total time: 1 hour

Supplies

  • Non permanent markers

  • White coffee filters

  • Pencil

  • Cups of water

  • Black pipe cleaners

  • String

  • Scissors

Directions

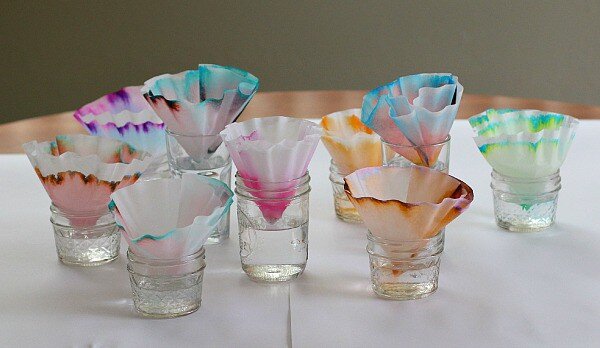
  1. Choose some markers to experiment with. Don’t be afraid to try black-- it ends up with the best results.

  2. Take one coffee filter. Put it on a newspaper or some kind of material to protect your table. Draw a thick circle around the center of the coffee filter where the rigid part meets the flat center. Use a pencil to write the color of the marker being used right in the center.

  3. Fold the coffee filter in half and then in half again, resulting in a cone shape.

  4. Get a short glass of water. Pull apart the cone shaped coffee filter so it balances right on the glass with the tip of the cone just touching the water. (Be sure NOT to let the marker circle go in the water)

  5. Let it sit and watch what happens as the water begins to flow up the paper.

  6. Repeat with different colored markers.

  7. After the water has reached the outer edge of the coffee filter, place it on a newspaper to dry.

  8. Once the coffee filters are dry you can observe the results.

  9. To make into a butterfly, cut your black pipe cleaners in half.

  10. Take one coffee filter and scrunch it up in the middle.

  11. Wrap a black pipe cleaner around the center.

  12. Shape the ends to form antennae.

  13. Tie a string to the center and hang.

Image source BuggyAndBunny.com

Image source BuggyAndBunny.com

Arctic Animals

Age Group: K-5th grade

Total time: 20 minutes

Supplies

  • Ice cubes

  • Cold water

  • Shortening

  • Sandwich baggies

  • Large bowl

Directions

  1. Put a large bowl of water into the freezer to let it get extra cold, and then add ice cubes.

  2. Put a bare hand into the icy water first, to get an idea of how cold the water really is.

  3. Stick your hand inside a Ziploc sandwich bag with a bar of shortening wrapped around it, and then another sandwich bag covering the shortening, to keep it from falling off in the bowl.

  4. Observe how you don't feel the cold-ness of the water when you have the shortening wrapped around the baggy. This is like the insulation arctic animals have that allow them to swim in extra cold waters.

Image source ForgetfulMomma.com

Image source ForgetfulMomma.com

Rock Candy

Age Group: 3rd-5th grade (with parental supervision for boiling water)

Total time: 1 hour

Supplies

  • Water

  • Sugar

  • Clothespin

  • Pot for boiling water

  • Wooden sticks (ex. Bamboo skewers)

  • Food dye (optional)

  • Jar(s)

Directions

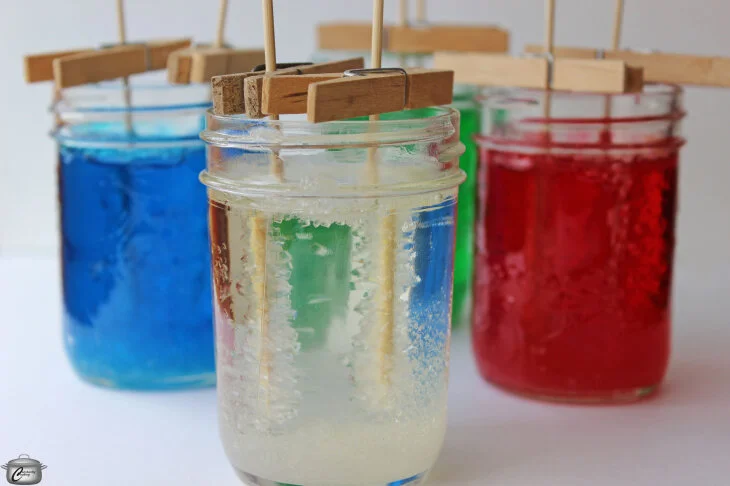
  1. Making the sugar/water mixture: Bring two cups of water to a boil in a large pot on the stove. Next, stir in four cups of sugar. Boil and continue stirring until sugar appears dissolved. This creates a supersaturated sugar solution. Allow the solution to cool for 15-20 minutes.

  2. Prepare your wooden sticks for growing the rock crystals. Wet the wooden sticks and roll them around in granulated sugar. Make sure you allow the sugared sticks to completely dry before continuing. You'll need one stick per jar.

  3. Once the sugar solution is cool, add in food coloring to create rock candy of your preferred color. (Optional)

  4. Pour the cooled solution into a glass jar (or jars) and insert the sugar-covered wooden stick into the center of the glass. Make sure that the stick is not touching any part of the jar. If it does, the candy crystals could get stuck to the bottom or to the sides. You can divide the sugar solution across several smaller jars or use one large jar, depending on how many sticks of rock candy you'd like to make.

  5. Once in place, secure the stick in place using a clothespin. Cover the top of the glass with a paper towel. You may have to poke a hole in the paper towel for the wooden stick to poke through.

  6. Place the glass in a cool and quiet place. Loud noises and a lot of movement can disturb the crystal making process. Every day, the candy crystals will grow larger. They will reach their maximum growth potential by two weeks. When you have a good amount of rock candy crystals, remove the stick and place it on a sheet of wax paper to dry...before eating!

Image source ConstantlyCooking.com

Image source ConstantlyCooking.com

Ice Fishing

Age Group: 3rd-5th grade

Total time: 30 minutes

Supplies

  • Small paper cups or an ice cube tray

  • Glass or bowl of water

  • String (yarn or kite sting works great)

  • Small stick

  • Salt

Directions

  1. Fill the cups, bowl or tray up with water and place it in the freezer to make ice cubes. You can also use ice cubes from your freezer and skip this step.

  2. When the water is frozen, remove the ice from the cup or tray.

  3. Put the ice in the glass or bowl of water. The cube will bob up and down in the water and then float on the top.

  4. Create your fishing pole by tying the string to the stick.

  5. Place one end of the string from the fishing pole on top of the ice cube and sprinkle salt on the ice where the string is touching. Watch as the water melts slightly and refreezes.

  6. After about 10 seconds, carefully lift the ice cube out of the water with the fishing pole. You caught a fish (ice)!

Image source LittleBinsForLittleHands.com

Image source LittleBinsForLittleHands.com

Pepper and Soap Activity

Age Group: K-2nd grade

Total time: 5-10 minutes

Supplies

  • Plate

  • Water

  • Dish Soap

  • Pepper

Directions

  1. Pour water onto your plate. Try to get the water to reach the edges of the plate before it starts to curve upward, but make sure not to overflow the plate!

  2. Add pepper all over the water on the plate. You can add as much or as little as you want! Try the experiment with different amounts of pepper!

  3. Pour some dish soap into a small container so you can dip your fingers in it easily.

  4. Dip your finger in the soap and touch the water at the center of the plate. Watch as the pepper moves towards the edges!

Image source FunLearningForKids.com

Image source FunLearningForKids.com

DIY Lava Lamp

Age Group: K-5th grade

Total time: 15 minutes

Supplies

  • Vegetable Oil

  • Water

  • Food Coloring

  • Original Alka Seltzer tablets

  • Glass to serve as lava lamp

Directions

  1. Pour vegetable oil into your lava lamp glass/container until it is about ¾ full.

  2. Pour about ½ cup of water into another container. Add food coloring until water is turned to the desired “lava” color.

  3. Poured the colored water into the glass with the vegetable oil. Make sure to leave enough space so the glass doesn’t overflow!

  4. Break the Alka Seltzer tablets in halves or thirds. Add pieces one at a time to get your lava lamp!

Image source FunLearningForKids.com

Image source FunLearningForKids.com

Simple Slime

Age Group: 3rd-6th grade

Total time: 15 minutes

Supplies

  • Elmer’s Glue | 1 ounce ~ ¼ of the bottle

  • Borax | ¼ cup

  • Food Coloring (Optional) | 2-3 Drops

  • Water | ¼ cup

  • Bowls | 2

  • Measuring Cups (¼ cup size)

Directions

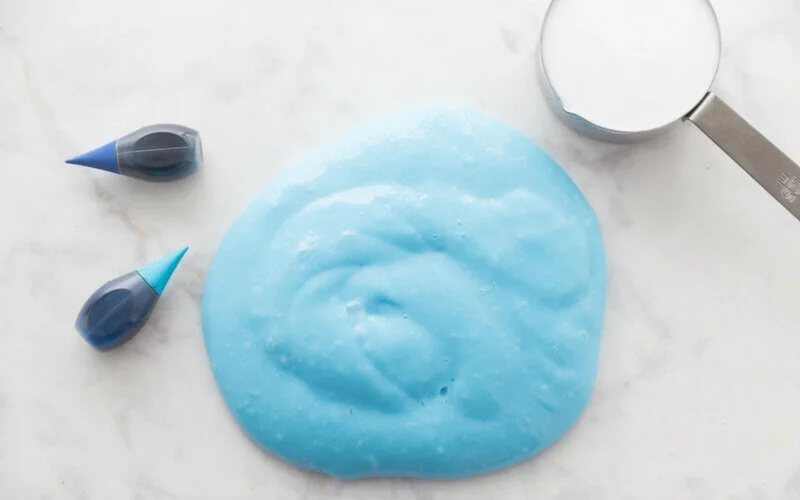
  1. In the first bowl, add 1 ounce of glue (roughly ¼ of the glue bottle) and ¼ cup of water (using the measuring cup).

  2. (Optional) Add two to three drops of food coloring to the glue and water mixture.

  3. Add ¼ cup of borax (using the measuring cup) and stir gently until the consistency has changed.

  4. Stir the mixture as much as you can and then knead it with your hands until it becomes less sticky. Careful, this step is a little bit messy!

  5. If there is left overwater just pour it out.

  6. Store your slime in an airtight container/plastic bag for later.

  7. CAUTION: do not put your slime down the sink, if you are ready to dispose of it place it in a waste bin/trash can.

Image source LittleBinsForLittleHands.com

Image source LittleBinsForLittleHands.com